Latest News & Events
How Assemblers Use X-Ray Inspection for BGA

Ball grid array package handling has it own set of problems and requirements. In replies from the field, five assemblers report how the technology is meeting quality demands.
When board designers began incorporating ball grid array (BGA) packages into their PCB layouts, electronics assemblers were faced with new and unknown challenges for processing these new forms of leadless components. Manufacturing and process engineers had a variety of theories, some of them conflicting, but little practical experience to guide them in adapting their processes to accommodate BGA packages. Contract manufacturers, in particular, often found themselves with the need to produce BGA boards on short notice. One major concern was the issue of inspection: How to verify a solder bond that cannot be observed? The use of X-ray inspection was proposed and, in some cases, summarily dismissed as too expensive. However, a survey of five different manufacturers currently processing BGAs reveals that X-ray inspection systems have proven to be valuable and cost-efficient tools for establishing process parameters and auditing production.
Establishing a Process
One contract manufacturer using film-based transmission X-ray to inspect BGAs is Fine Pitch Technology (FPT) of San Jose, Calif., a wholly-owned subsidiary of Solectron, with 160 employees. The company spent about eight months developing a process and has been producing BGA boards for use in computers (both Internet and networking products) for about 18 months. Frank Vernon, process engineering manager, says that the company also does significant BGA rework, often on boards not originally assembled at its facility, on a rapid turnaround basis.
For rework projects, boards are usually X-rayed on arrival to see what problems may exist from the original processing, and again after rework. For work that originates at FPT, Vernon has found few problems. “The BGA process works well. We generally have not had to repair anything we’ve done … yields are excellent.”
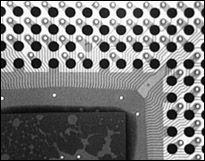
 |
FIGURE 1: Bridging, a common defect shown here, can be identified using the X-ray system. |
Vernon notes that the X-ray system is useful for identifying bridging, shorts and collapsible opens (Figure 1). Having gained experience with both BGA and X-ray inspection over time, he adds, “We’ve begun to develop a sense of will and will not work.” He recalls one instance where a design was received with a mask that was done incorrectly. After pointing out the problem, he was told to go ahead anyway. Only five boards were run, each was X-rayed and the problem was found; the remainder of the run was re-masked. “The X-ray enabled us to spot the problem early on,” states Vernon. And, on the issue of voiding, Vernon reports that process control is the best way to prevent it. “It’s a question of getting your process right before you start.”
The images that are produced during X-ray inspection are generally filed and have often proven useful in helping to answer questions. “If a customer calls and says he thinks there’s a short under a BGA, we ask for the serial number and pull the photo,” he continues. “We can say with certainty whether a short exists. On request, we can even send the photo along for verification.”
Checking Both BGAs and ICs
Another large contract manufacturer handling BGAs is Altron, located in Anoka, Minn. (200 employees and annual sales of nearly $30 million.) The company has been processing boards bearing both plastic and ceramic BGAs in a variety of sizes up to 503 I/Os for about two years. Production supervisor Gary Smith explains that X-ray inspection is used to establish process parameters and then for a 1percent production audit at two points in the process: after placement to check for component alignment and after reflow to inspect for bridging, opens and solder voids.
As to BGAs, Smith says, “We like them. We haven’t encountered many problems or found any major defects yet. Bridging is very minimal. And we haven’t found that solder voids are a problem down the line. The few we found were very severe and were sent back to the component manufacturer.”
He reports that boards are more likely to be rejected for misaligned components, improper rotation, insufficient solder or major outgassing. Even though the transmission X-ray reveals obvious outgassing (but not minute holes), this has not proven to be a concern for Altron over the past two years. “The minute holes don’t affect functionality and there is no spec on BGA yet. If they do have any long-term effect, they haven’t come back to us yet,” Smith says.
In addition to BGA inspection, the X-ray system has been used by the test department to track internal shorts in boards and to identify problems with ICs. In one case, Smith explains, “We were experiencing 30 percent failures. The component manufacturer claimed that our process was at fault. To determine the truth, we took the parts directly from the waffle packs and X-rayed them. Sure enough, we found internal shorts.” The company was able to present X-ray images of the problem ICs to the manufacturer to verify their findings. Overall, Smith finds the X-ray system “a useful tool for verifying your process.”
A Place with Smaller Assemblers
Accu-Tronics of Raleigh, N.C., with 75 employees and under $10 million in annual sales, specializes in high technology, moderate-volume production and rapid prototyping. It has been assembling boards with both PBGAs and CBGAs for two years. President Scott Brown says the company inspects 100 percent of prototypes, then samples 10 percent of low volume production runs. It also performs a first-piece X-ray inspection for placement accuracy prior to reflow.
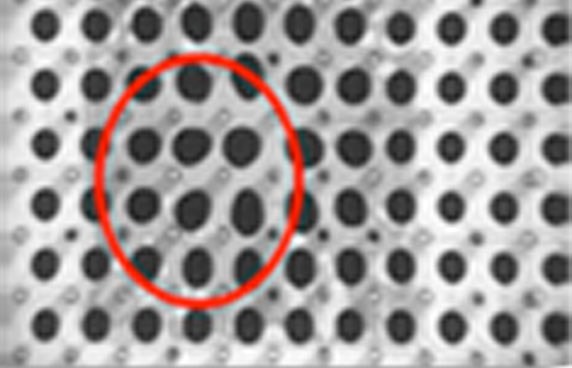
Overall, defect levels are extremely low since the BGA is an inherently superior package to the fine-pitch QFP. “On occasion we find bridging, misregistration and missing solder balls,” Brown reveals (Figure 2). “Our X-ray inspection system is good for these problem classifications and we’re still evaluating the acceptability of void content in the solder joints. I think everyone’s trying to figure that out.”
 |
FIGURE 2: Although BGA defects are relatively low, missing solder balls can be detected using the X-ray system. |
Another small manufacturer uses real-time X-ray to inspect BGAs. World Electronics of Morgantown, Pa., with 65 employees, manufactures elevator electronics and also does contract assembly. The company has been processing BGAs for its contract customers for about eight months. Quality Control manager John Menuchak explains that, because the process is new and most of the runs are small (40 to 50 boards average), 100 percent of BGA production is currently inspected. As both volume and confidence in the process increase, he anticipates moving to production audits for inspection. Among the few defects: “Only one or two with bridging, one misregistration,” Menuchak reports. “We haven’t seen any problems yet with missing bumps or voids. Of our total BGA production, defects have been a fairly low percentage.” World Electronics has installed a portable RTX Mini real-time X-ray system* in its quality control laboratory.
To Speed Prototyping
Encore Computer Corp., in Melbourne, Fla., is a manufacturer of scalable real-time data-storage, data-retrieval and data-share technologies. The company is in the process of developing boards with BGAs and uses a portable real-time RTX Mini X-ray system for 100 percent of its prototype runs. “X-ray inspection is imperative so that we know the process,” says process engineer Pat McDonough. Initially, the company inspected components both before and after reflow. “When you can’t see under the component,” says McDonough, “that’s a process engineer’s worst nightmare.” But as prototyping progressed, the first inspection has been eliminated. “We have confidence that BGAs are self-aligning and we know that we are placing them accurately,” he explains. In post-reflow inspection, McDonough finds that transmission X-ray is very good at picking up voiding and shorts. “We experienced some bridging, but once we corrected our process, it disappeared.” Overall, he finds that “BGAs are highly manufacturable parts. Defect rates are as low as 1 to 4 ppm.”
The X-ray inspection system has also been useful in identifying popcorned (cracked molding) BGAs. Some components had been used on an early prototype run but apparently the remainder were not properly sealed in their plastic packaging. When they were used again a month later, they had absorbed moisture. “Plastic BGAs are very sensitive to moisture” explains McDonough. “After X-raying the first board and seeing the popcorn effect, we baked the rest of the components and eliminated the problem. There’s no way we could have established process parameters as quickly as we have without the X-ray.” he continues. “Absent that capability, those boards with popcorned BGAs may have sat for months on a test table for debugging. We’ve come to learn a lot using X-ray, because it tells you a lot about your process.”
*RTX Mini is a registered trademark of Glenbrook Technologies.
As reprinted from SMT, August 2014.


